Unit 2
Pinch Pots

Plan:
1. Create a pinch pot
2. Smooth it out
3. Score and slip vines onto the cup
4. Shape the top of the cup to look like petals
Unfortunately, this piece was lost. I haven't been able to find it.
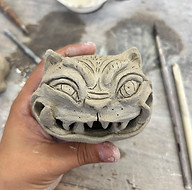


Plan:
1. Create two pinch pots
2. Attach pinch pots together using score and slip method
3. Cut out hole for mouth/smooth out inside of sphere
4. Make eye sockets/attach eyes, nose, ears and teeth using score and slip method
5. Add additional details by carving into clay
After 1st fire:
6. Use underglaze to paint the face, after glaze dries, use clear glaze over the full sculpture
(Repeat of expression project from Unit 1)


Plan:
1. Create two pinch pots and connect them using score and slip method
2. Cut them apart in a jagged way to mimic a coconut
3.Shave down sides to create inside of coconut
4. Cut out holes for the top
5. Score and slip on flower and straw
6. Bisque fire and glaze
Reflection:
Overall, I liked how my pinch pots turned out. The coconut is my favorite out of all of them, I don't have much critique for that one. However, for the tiger, I would have used different colors and I also would have spent a bit more time glazing. I kinda rushed that one because I had other projects that I was excited to work on and I already didn't like the base of the tiger. For the first pinch pot, I wish I hadn't lost it because I was going to make a tea set, but it just gives me a chance to make an even better one.
Small Animal Sculpture


Plan:
1. Create a sphere of clay for the shell, and carve out the middle for the indent
2. Cut out fin shapes for fins from a slab of clay, score and slip them onto the underside of the shell
3. Create a smaller sphere of clay for the head
4. Glaze with underglaze
After 1st fire:
5. Cover with clear glaze
(Repeat of choice project from Unit 1)
Reflection:
I really liked how this turned out. I love the contrast between the navy (___ - cone 05) and the light blue (____ - cone 05). Next time, I have to remember to glaze the bottom because it's something I often forget to do. Luckily, I did not intend for this piece to be used by water, so it should be fine. I like the designs I did on the front fins as well as the spirals I did on the shell. There's not a lot more I can say about this piece since I like it so much, I ended up giving it to my sister, and she loves it!
Historically inspired piece


Plan:
1. Create two pinch pots and attach them together
2. Create a cylinder and attach it to top of the sphere, cutting out a hole for it
3. Create handle and score and slip it on
4. Score and slip on leaves and ladybugs
5. Bisque fire and then glaze
Reflection:
Overall, I liked how this turned out. Its a little bumpy, but I feel like that's to be expected because I didn't throw this. I love how I glazed the leaves and ladybugs, but I thought the base color would be greener, so if I did it again, I'd pick a different color. I love the contrast of the green leaves and the red ladybugs though. I also would've painted more glaze on, as it is a little thin in some places.
Relief tile/mini masterpiece

Plan:
1. Create slab using machine
2. Score and slip details from the painting on
3. Carve out some details
3. Paint with underglaze